Introduction
A dumpy level, also known as an automatic level or builder’s level, is a tool used to determine the elevation of landmasses. Though they may appear intimidating or confusing, dumpy levels are relatively simple to use once you understand how to set them up and what types of measurements they provide.
Dumpy levels are also known as builder levels, Y levels, and so on. Willian Gravatt invented it in 1832. The dumpy level’s operation establishes the relationship between two or more points on a horizontal surface using an inbuilt telescope and a bubble level. The primary advantage of using the Dumpy level over other leveling instruments is its greater accuracy. For most Tacheometric methods, a dumpy level is known for high precision values. A dumpy level’s accuracy can be as high as 1:4000 for every 100 meters.
The dumpy level achieves the following surveying goals:
- Determine the relative height and distance between various surveying land locations.
- Determine the close distance between several surveying land locations.

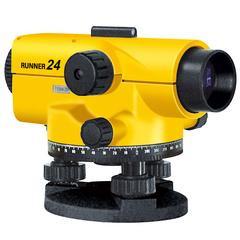
Fig 1: Dumpy Level
Courtesy: One Point Survey Equipment
Advantages of a Dumpy Level
Some of the advantages of the dumpy level are –
- The dumpy level is very simple to use.
- In comparison to theodolite and total stations, the cost of the dumpy level is very low.
- The instrument requires very few adjustments to be set up.
- It has high optical power.
- It provides an extremely accurate level of reading.
- Bubbles can be adjusted from any angle or side. This can be accomplished with any three screws on hand.
- There is an inherent compensation mechanism in auto levels. Wherever needed, this device will automatically change the line of sight.

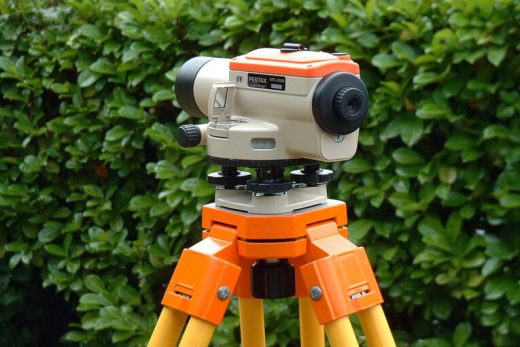
Fig 2: Dumpy Level on a tripod stand
Courtesy: Concrete Civil
Disadvantages of a Dumpy Level
Some of the disadvantages of dumpy level are –
- Vertical angles are impossible to quantify. Only a horizontal plane can be measured with an auto-level, and horizontal angles are not very accurate.
- This is a two-person operation. Two people must operate dumpy levels: to see through the lens and hold the staff or measuring rod.
- Dumpy levels necessitate strong math skills. To use dumpy levels, you’ll need a decent understanding of ratios and computing offsets – like with all manual computations, they are only as good as the person doing them!
- They can only be used in good lighting conditions. At dusk or in dimly lit places, you can’t use a dumpy or an auto-level.
- Dumpy levels can become inaccurate and render a gadget inoperable if not properly maintained and set up. Make sure your dumpy levels are always calibrated and that you have it serviced on a regular basis.
- Dumpy levels aren’t as adaptable as laser levels. In earthmoving applications, dumpy levels and auto levels are not compatible with machine receivers. They can also only measure one place at a time, whereas spinning laser levels can be used simultaneously by numerous users on the construction site.
How to use a dumpy level?
Some of the steps to use a dumpy level are –
- Locate a benchmark near the area you want to measure. A benchmark location is one where the height has already been determined according to earlier land surveys. To receive the most accurate data from your dumpy level, go online and look for a benchmark location close to the area you wish to measure.
- Place your tripod near the area you’d like to measure. Place your tripod between your benchmark site and the spot you wish to measure on a flat, clean stretch of ground. Then, on each leg of your tripod, release the latches and stretch each leg out. Close each latch after adjusting the legs until your tripod is absolutely level. A bubble level is built into almost all tripods. This can be used to determine if the tripod is level. Set up at a point that is slightly higher than your benchmark location to measure the region properly.
- Attach your device to the tripod and place it over two leveling screws. Screw your dumpy level onto the tripod’s base plate, then connect it to the main tripod body. Once the instrument is securely fastened, rotate the telescope of the dumpy level to parallel it with two of the device’s levelling screws. Tighten the leveling screws to secure the device better if the dumpy level wobbles when tapped.
- Adjust the two leveling screws to level the device. Look for a standard bubble level somewhere on your device. When you’ve found it, grab the two leveling screws parallel to the telescope and twist them in opposite directions. Repeat this process until the bubble is in the exact center of the level. Turn the screws with an even amount of force and pressure for the best results. The bubble level is usually found on top of or below the device’s telescope.
- Adjust the third leveling screw by turning your telescope 90 degrees. Turn your telescope 90 degrees after adjusting the first two leveling screws so that it is parallel to the device’s third leveling screw. Adjust this screw so the bubble is in the center of the level once more. Instead of three leveling screws, old model dumpy levels frequently had four. If this is the case, adjust the second pair of screws in the same way you did the first pair.
- Turn your level 180 degrees to check its calibration. Return your telescope to its starting position after making your initial leveling adjustments, and double-check that the bubble is still in the center of the level. If so, rotate the telescope 180 degrees and double-check the level. Once all three spots show the bubble in the level’s center, you can concentrate the device. Repeat the leveling process until the bubble is centered in one of the three spots.
- Remove the lens cap from your dumpy level. The lens cap shields your device’s lens from dirt, grime, and debris. Keep the lens cap on your instrument until you’re ready to use it to avoid damaging it. If your lens is dirty, use a pre-moistened lens wipe to clean it. These are available at most camera stores as well as several big-box stores.
- Adjust the eyepiece until you can see the crosshairs of the device. Keep a paper or an object directly in front of the lens to fill its entire field of vision. Then, turn the focusing knob on the eyepiece until you can see the dumpy level’s crosshairs. When you’re done, your crosshairs should be dark, sharp, and easily visible.
- Twist the focusing knob on the device until the image is clear. When you can see the crosshairs, aim your device’s telescope at your benchmark location. Find a large, distinct object in the area, such as a tree or a hilltop, and then twist your device’s primary focusing knob until the thing comes into focus. If you’re having trouble concentrating, have a friend or coworker hold an E staff near the benchmark spot for you. This metered measuring stick will provide you with a simple object to focus on.
- Place an E staff member at the top of your benchmark list. Purchase an E staff if necessary, either online or from a survey equipment store. Then, have a friend or coworker keep the staff at the top of your benchmark spot. Have a friend rock the staff forwards and backward for the most accurate measurements while recording the lowest number you read. Most E staff collapse to save space, so extend your staff before taking any measures. If you’re taking measurements beneath power lines, use a fiberglass staff rather than a metal one.
- Determine the height difference between your current level and the benchmark location. Locate the E staff using the telescope on your dumpy level. Then, take the measurement indicated by your device’s horizontal crosshair in the center. This is referred to as your backsight.
- Using the benchmark height, calculate the actual height of your level. Once you have your backsight measurement, multiply it by the actual height of your benchmark location. This will display the current height of the telescope on your dumpy level. Make a note of this measurement so you can use it to determine the height of your next location.
- Calculate the height difference between your level and the unmeasured location. Place your E staff directly on top of the area you want to measure. Find the staff using your device’s telescope, then record whatever number the device’s center leveling, horizontal cross-hair sits over. This is referred to as your foresight. If necessary, adjust the focusing knob on your eyepiece until you can see the staff. If the location is too high or too far away to measure, move your staff to a lower, closer location first. Determine the height of this new location, then relocate your dumpy level to it and repeat the measuring process.
Conclusion
Dumpy levels are the easiest instrument to be used for leveling works. Civil engineering relies heavily on surveying as implementing any construction works. It is important to do a detailed survey of the area so that no complications arise later in the construction stage.
References
- Aline, “Pros and Cons of Dumpy Levels”- https://www.alinelaser.com.au/laser_accessories_invest-copy
- Wikihow, “How to Use a Dumpy Level”- https://www.wikihow.com/Use-a-Dumpy-Level
- Civiltoday, “Dumpy Level Survey–What, Where, How, Parts”- https://civiltoday.com/surveying/12-dumpy-level
- Civilmint, “Dumpy Level Survey”- https://civilmint.com/dumpy-level-survey
- Construction News, “What is Dumpy Level in Surveying”- http://www.constructionnews.co.in/what-is-dumpy-level-in-surveying.html
If you have a query, you can ask a question here.


Rich of information